Sunday, March 31, 2013

Chocolate Ganache Cake


I wanted to make an Easter post wondering what to post too..But when i tasted this cake i had baked yesterday I knew i had to share it here today :) 

Wishing everyone a Joyful Hopeful Easter Season :)


I haven't baking for a while now and I realised how much i wanted to bake these last days.I was missing it so much that i started dreaming about baking (happens quite often ...dreaming about food!)


I got a new toy in my kitchen too a mixer bowl + mixer.I totally love it.My mom got it for me.Its so handy and i could save a lot of mess that usually happens while cake mixing.

I wanted to bake something really nice for Easter and it had to be chocolate because we are all chocolate lovers here at home and whether good or bad i know it will vanish!Let me tell you i wasn't too happy with the way the cake came out looking from the oven and i wasn't sure what to expect from the original recipe too even though they have a picture attached here.

Defrosted and out on a plate

Sinful chocolate ganache :)
When i opened the refrigerator to unmould the cake the was like a lava cake and i was so disappointed I wouldn't be able to take a picture.I just stashed it in the refrigerator and when we took it out straight from the freezer it was magic!  


Source :  Here

For the cake You need :

Dark /milk chocolate 500gm
Butter 125gm 
Caster Sugar 1/4 cup
Eggs 4
Plain flour 2 tablespoon

Maltesers to serve

For the chocolate ganache 
Equal portions of Thin Cream and chocolate 

  • Preheat oven to 200C, grease and flour a baking dish/tin and leave aside.Use spring form pan if you have.
  • Using a double boiler,met chocolate - place butter,chocolate and one tablespoon of caster sugar. Stir until all has mixed well.
  • Beat the eggs and remaining sugar with a beater until pale and thick for about 10 mins on med-high speed.Fold in the flour gently, then the chocolate butter mix gently,do not beat while adding the chocolate mix.Mix until uniformly done.
  • Pour into the prepared dish or tin and bake fpr 15 minutes.Or until the sides are done and middle is still little wobbly.Remove from oven.
  • Run a knife along the edges of the cake and let it cool.Once cooled place in the freezer for 4 hours.
  • De - mould the cake to do this leave it out of the freezer for an hour and once its out of the dish freeze again.
  • Just before serving - prepare the ganache but bringing cream to boiling point and pour it over the chopped chocolate and stir well until creamy.


  • To serve, take the cake straight out of the freezer and drizzle ganache and serve with Malteser balls.

Enjoy this decadent chocolate ganache cake!

My thoughts:
  1. If the centre is not set just stash the cake in the freezer it will set.
  2. Don't leave it out for too long it will become loose immediately in the heat(in Chennai atleast)
  3. I used Milk chocolate chips you can use baking chocolate or dark chocolate.Mine was a bit too sweet with the milk chocolate and the sugar i could think of reducing some sugar.
  4. The original recipe calls for 1 tablespoon of flour for 4 eggs i halved the recipe and used 1 tablespoon and some more of flour the cake was fudgy in texture.
  5. It took me around 20 minutes to bake the cake which was set on the sides and wobbly in the centre.But the top was nice and set.
  6. You can just bake it until fully baked ie.until the skewer comes clean i think it will taste well too.


Linking this to Cutchi's kitchen - 100th post give away


Chocolate Ganache Cake


I wanted to make an Easter post wondering what to post too..But when i tasted this cake i had baked yesterday I knew i had to share it here today :) 

Wishing everyone a Joyful Hopeful Easter Season :)


Saturday, March 30, 2013

Fruit custard in a glass

Tired of your regular fruit custard and jelly try it this way :) Fruit custards are the most easiest desserts its always there at my place if i'm not prepared with any other desserts.More over i like it that we have some fruit and milk going in along with the rest of the goodness too.Thinking of an easy quick to make dessert for Easter this is what you must try!

May The Risen Lord fill your lives with peace and tranquillity.
Happy Easter to all my friends :)


Ever since i made my tiramisu in a glass i have fallen in love with desserts in a cup :) I wanted to try more and ofcourse want to get more indulgent in making them but I didn;t have enough ingredients so I decided to try the custard jelly combo this way and it worked like magic!

It was a better hit than making it all in one bowl :) The appearance after all does matter!(someone even snatched my portion)


Serves 3 and some extra jelly
Preparation time 30 mins  + setting time

You need
Milk 2 cups 
Vanilla Custard powder 2 tsp
Strawberry/rasberry Jelly one packet 
Sugar 2 tablespoons
Fruits - apples,bananas,strawberry
Almonds chopped

To serve:
3 glass tumblers or bowls in which you want to set the custard
  •  Mix custard powder in a bowl without any lumps and leave aside.
  • Heat milk and add sugar and mix well until dissolved add the mixed custard powder mix and stir well to avoid any clumps.You need to make this a little thick add more powder if you feel it won;t set hard so you get distinct layers.
  • Mix the chopped nuts to this and set aside.
  • Take the glasses, fill the bottoms with the chopped fruits.This forms the first layer.
  • Pour a layer of custard over this and leave in the refrigerator to set.This is the next layer.
  • Once the second layer is set, prepare the jelly as per instructions on pack and let it cool.
  • Check if the jelly mix has cooled and then pour it over the custard layer.Repeat for each of the glasses and return them to the freezer or fridge as per the instructions on jelly pack.
  • Garnish the tops with chopped almonds.


Enjoy cool custard in a glass  :) 

My tips: 
  • You can mix the fruits in cream or just leave it as it is.
  • Use any flavour custard powder that you like.
  • Use any fruits of your choice but bananas in custard are like the magical combo!


Fruit custard in a glass

Tired of your regular fruit custard and jelly try it this way :) Fruit custards are the most easiest desserts its always there at my place if i'm not prepared with any other desserts.More over i like it that we have some fruit and milk going in along with the rest of the goodness too.Thinking of an easy quick to make dessert for Easter this is what you must try!

May The Risen Lord fill your lives with peace and tranquillity.
Happy Easter to all my friends :)


Thursday, March 28, 2013

Beetroot Croquettes/cutlets

Vegetables are difficult to get into our systems many times even for us adults and redressing it gives it a refreshing look and taste!I know many of you agree to that.


 I won this book from Nithu's Kitchen for the Healthy Food for Healthy Kids-Sandwich hosted by Jaleela last month (Feb-March '13) Thanks Nithu and Jaleela for choosing me winner.


I love vegetable cutlets but usually we do no add beetroot because of its strong colours its just read all through if you add this lil beauty.But we all know beets are really healthy.When i was carrying my older one i had plenty of beet juice of course mixed with carrots and apples because i don't want to imagine how just beet juice would taste by itself.


I have a large can of breadcrumbs sitting in my pantry and I just made it because of that but my LM ate a few of these so I was glad i made them.


You need

Boiled vegetables
  1. potato 1 small
  2. Beetroot 1 small
  3. Peas a handful
  4. Carrots 1 small
Coriander leaves few sprigs
salt to taste
Chilli powder 1/2 tsp
Cumin powder 1/2 tsp
Garam masala 1/2 tsp
Maida/all purpose flour 2 tablespoons mixed in water to make a solution to dip in
Bread crumbs

Oil to deep fry

- Boil and mash the vegetables and keep aside.Mix salt,coriander leaves and the dry masala powders.
- Roll the mashed vegetables into any shapes you prefer.I rolled them into small balls.
- Mix maida in a little water to make a runny mixture so you can dip the above vegetable balls and roll them in bread crumbs.
- Repeat for all the cutlets and set aside.You can do this ahead of time and leave in a air tight container in the freezer/fridge.
- Deep fry these  breaded balls and drain them onto a tissue paper.


Beautiful red beetroot cutlets are ready!Serve them with sauce.

  • Boil the vegetables soft and mash them well if the mix becomes too loose the cutlets will break, for an emergency situation add a slice of bread or two so that will make the mix less moist.
  • Usually we need to dip the cutlets in egg before coating them with breadcrumbs i have use a paste of all purpose flour and it worked well.You can use a solution of corn flour as well.


Sending this to Easy 2 prepare in 15 mins ,Cook like a celebrity chef #5Bon Vivant 13 - Kids' delightLets cook for Kids , Lets celebrate March Masti


Beetroot Croquettes/cutlets

Vegetables are difficult to get into our systems many times even for us adults and redressing it gives it a refreshing look and taste!I know many of you agree to that.


 I won this book from Nithu's Kitchen for the Healthy Food for Healthy Kids-Sandwich hosted by Jaleela last month (Feb-March '13) Thanks Nithu and Jaleela for choosing me winner.

Sunday, March 24, 2013

Chicken biryani with green spices - My 200th post

It was around this time last year that I started blogging actively since I don't have a proper date I first actively started blogging, I decided to celebrate my 100s(I registered this blog account in 2006) and I reached 200 posts today. I want to celebrate my joy with this flavourful biryani to all my virtual world friends who make me come back to write every post.


When I reached my 100th, i was sceptical if i could go on, and this is a feat i could achieve only because of all the encouragement i receive from my lovely bloggy friends and The Lord almighty above. I remember the simple hymn ' All things bright and beautiful .... ' we learnt in school just a simple song that reminds us that all things small or big were made by the Great God.


I like to try out different biryanis often so much so that I usually never stick on to the same one. I found this recipe( altered to my tastes) long back while I was in London(I think everyone knows that I didn't have blender/mixie there)I used a mint chutney out of a jar to make this biryani except for the color(the mint from the jar gives you a blacking shade than a greenish one) everything used to be perfect.

You need to do this in 3 steps :

Marinade 
Chicken 1/2 kg 
Yogurt 2 tablespoons
Red chilli powder 1 tsp
Coriander powder 2 tsp
Garam masala 2 tsps
Turmeric powder 1/2 tsp
Aniseeds/ saunf 1 tsp
Ginger garlic paste 2 tsp
Salt to taste
  • Marinate the chicken for about half hour or more for best results.


Grind
Large handfull of coriander leaves and mint leaves with a little water


Biryani
Basmati rice 2 and half cups soaked for about 1 hour
Water 5 cups
Whole spices 
  • cardamom 5 
  • cloves 5 
  • cardamom 2 pieces
  • star anise 1 

Green chillies 2 slit at the top
Cashews and raisins optional few of both 
Curd 2 tablespoon
Onions 2 large chopped finely
Tomato 2 large finely
Oil/Butter/Ghee 3-4 Tablespoons
Lime juice 2 tablespoons
  • Heat oil in a wide mouthed dish/vessel(whichever you want to prepare the biryani in), add oil/butter and add the whole spices in.
  • As the spices pop, add green chillies and onions.Let it fry well until dark brown and caramelized.
  • Add the marinated chicken and cook well in the chicken's own juices.
  • Add the green paste and let it coat the chicken well.
  • Add the chopped tomatoes and cover it so the tomatoes breakdown soon.
  • Add the curd to this and stir well.
  • Drain the rice and add the basmati rice to this.
  • Add the water and check for salt now.Add the lime juice to this water.If you find the spices less add garam masala to your taste now.
  • Cover the vessel now and let it cook for 12-15 mins on medium flame.


Serve yummy flavourful biryani hot with raita and papads.

Chicken biryani with green spices - My 200th post

It was around this time last year that I started blogging actively since I don't have a proper date I first actively started blogging, I decided to celebrate my 100s(I registered this blog account in 2006) and I reached 200 posts today. I want to celebrate my joy with this flavourful biryani to all my virtual world friends who make me come back to write every post.


Wednesday, March 20, 2013

Divya's Guest post - Apple Chocolate Milkshake

My first ever guest post on my space by Divya of You too can cook.Most of you are familiar with Divya Pramil - she's a simple,sweet and an amazingly talented food blogger/photographer.Initially when I saw her space I would be left agape wondering how one can capture such simple things like tomatoes so beautifully, its that thing called talent and creativity that makes Divya so extra ordinary.Over the last few days we got to chat online and to my great surprise I discovered that she;s pretty closeby to my native place which multiplied my affection towards her many fold.I requested her to do a guest for me and she gave me this simple beautiful recipe.Lets see what Divya has to whipped up for us - 


Hello friends I feel so glad in sharing with you my guest post that I have made for a lovely friend and blogger Princy Vinoth. She is a very kind, down to earth, email-friend  of mine who mails me very often; we ramble about various things and our convo goes on about blogging, her lovely family specially her little kid Loritta. Our friendship sparked with a Google plus convo that later turned into email friendship. She is another humble and affectionate person that I have met through blogging who never forgets to say "hi" atleast even among busy schedules. Never in my life did I expect to come across such lovely people and I thank God and blogging for that. Am so glad to have known her and it is a pleasure for me to do a guest post for her. The best thing about this guest post is that I am the first guest on her blog and am super excited about it. She was so kind and thoughtful that she wanted mine to be the first guest post on her blog, moreover she included that any recipe would do. I am really so very honored and feel like she has honored a friend in the best way. Thank you so much for making me feel so special Princy akka. As I was thinking about a recipe to guest post at her space, her little kid came into my mind and so I made a recipe that I guessed she might love. Before I get into the recipe I would love to thank Princy Vinoth for the opportunity to guest post at her space. I enjoyed making this guest post for you akka. 


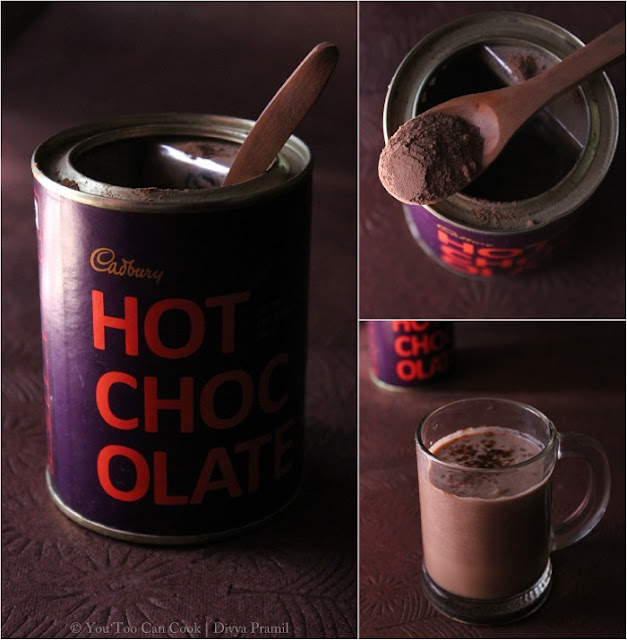
Coming to the recipe, kids usually seem to avoid fruits but they do love chocolates and so I have made a smoothie with a combo that is healthy as well as chocolaty. Your kid will never guess that there is an apple in the glass. It is not just for kids but for all chocolate lovers out there. This is a very filling, yummy and fuss free smoothie, as you just need some apple slices, chocolate powder and few minutes in hand. Try it and see them relish both health and taste. 


INGREDIENTS
Serves one person
Total Preparation Time - 5 minutes
  1. Milk - 1 glass (chilled)
  2. Apple - 1/2 of a medium sized apple 
  3. Vanilla ice-cream - 1 small scoop (optional)
  4. Cadbury hot chocolate powder - 1½ spoons 
  5. Sugar - If required 
PREPARATION METHOD
  • Peel of skin from apple and chop into smaller cubes. 
  • Add all the ingredients onto a blender and blend well until smooth. 
  • Pour into a serving glass and serve. 

TIP : You can add more apple slices if you wish to. And adjust the sweetness according to your wish. I haven't added sugar as it was sweet enough. The hot chocolate powder had enough sweetness and apples were sweet too, so add accordingly. 


Yummilicious chocolate apple milkshake is now ready!! 

 
Thanks again Divya for this lovely looking shake!(P.S - I already made this before i posted this and its seriously good!)


Divya's Guest post - Apple Chocolate Milkshake

My first ever guest post on my space by Divya of You too can cook.Most of you are familiar with Divya Pramil - she's a simple,sweet and an amazingly talented food blogger/photographer.Initially when I saw her space I would be left agape wondering how one can capture such simple things like tomatoes so beautifully, its that thing called talent and creativity that makes Divya so extra ordinary.Over the last few days we got to chat online and to my great surprise I discovered that she;s pretty closeby to my native place which multiplied my affection towards her many fold.I requested her to do a guest for me and she gave me this simple beautiful recipe.Lets see what Divya has to whipped up for us - 


Saturday, March 16, 2013

Rice kheer/Pudding

Its the weekend lets celebrate :) isn't that reason enough to make a sweet dish.I didn't even wait for weekend i just made it one afternoon to beat the heat and it was super delicious and creamy.If you want to make an instant(almost) dessert this is what you should be thinking!


My DH even asked me how i've never made this before and that it was really nice.The simplicity of this dessert is what makes it so delectable.Its also fat-free except milk ofcourse.
I had some cooked basmati rice in hand and was wondering what to do with so little of it.So i remembered watching some cook on tv adding some to his phirni I didn't exactly know if that was appropriate i thought you added rice flour to phirnis anyway i thought i'll research on it later.

This kheer really surprised me because i wasn't expecting such a luscious dessert to be the outcome.If you're wondering why i'm stressing the point that its delicious so many times you have to try it first.


Preparation time:20 mins
Serves 2 generously

You need
Boiled milk 2 cups
Cooked basmati rice 1 cup
Sugar 4 5 tablespoons as per your sweet intake
Cardamom pods/elaichi 2 crushed
Saffron few strands /optional
Rice flour 1 tsp

  • Add cooked rice to the boiled milk and keep this on a low flame. Keep stirring it occasionally our aim is to nicely soften the rice so we get a creamy consistency.This should take about 10 12 minutes.
  • Add the crushed cardamom pods.
  • Try to mash the rice with a ladle and if you are to able to do it thats about enough.
  •  Add sugar and mix well cook well until all is mixed well.
  • Add strands of saffron its ok if you don't have it thats perfectly ok.
  • Sieve the rice flour into this mixture and cook for another 5 minutes.
  • Pour into desired dishes and cool for 2 hours.

Enjoy nicely chilled kheer on a hot afternoon or makes a creamy easy dessert.

Tips:
- Cook rice by whatever means you are comfortable with, i cooked it in the pressure cooker.Alternately cook the rice until soft and add the milk to it.
-Since i had pre cooked rice i added it to the rice, you can cook rice directly in milk that would be even more nice and creamy


Sending this to
Easy to prepare in 15 minsLets cook for kidsBon Vivant 13:Kids delightCook like a celebrity Chef


Rice kheer/Pudding

Its the weekend lets celebrate :) isn't that reason enough to make a sweet dish.I didn't even wait for weekend i just made it one afternoon to beat the heat and it was super delicious and creamy.If you want to make an instant(almost) dessert this is what you should be thinking!


Tuesday, March 12, 2013

Pasta with cheese and lime chicken

Its been  while since we had pasta, so i made it for breakfast this weekend.Since i had some chicken in hand so this is what i whipped up and it was a wonderful breakfast a break refreshing break from our everyday southindian fares or breads.


 I usually make plain pasta for my lil one and she doesn;t like any spices except in her chicken.So since the pasta had chicken it was a great weekend treat for her and us all alike.My laptop charging wire is broken and so i had to sit on this desktop of ours and compose this and its taking forever!finally i'm glad atleast i can post something after a week.We all know how addictive blogging can be ;)

 You need

Pasta any shape cooked 1 large cup

To make the sauce
Onion puree 1 large onion
Tomato puree 2 medium tomatoes
Garlic pods minced 4 5
Capsicum  half a medium sized one chopped finely
Carrot 1 medium chopped finely
Garam masala 1 tsp
Pepper powder 1/2 tsp
Tomato sauce 1 tsp
Oil/Butter 2 tsp +2 tsp
Salt to taste
Cheese cubes 1

To prepare the chicken
Boneless chicken pieces chopped in to small pieces half a cup
Salt to taste
Red chilli powder 1/2 tsp
Lime juice of half a medium lime
Oil 1 tsp
Heat oil in a pan, add the chicken and fry until done.Keep aside.


  • In a pan heat 2 tsp oil, add the chopped vegetables and saute them well.Keep aside.
  • Heat oil in same pan, add oil, add the chopped garlic and saute well.
  • Now add the onion puree and fry well until the oil leaves the sides.
  • Add the tomato puree and tomato sauce and cook well until both are well combined.
  • Add the garam masala and pepper powder.
  • Add the cooked pasta and mix well.Check for salt.
  • Add water if you want it a little loose.
  • Mix in the sauteed vegetables and lime chicken.
  • Add chopped cheese cubes.


http://foodssrilanka.blogspot.sg/2013/03/cook-like-celebrity-chef-5.html

Sending this to Bon Vivant:Kids Delight, One pot meal

Pasta with cheese and lime chicken

Its been  while since we had pasta, so i made it for breakfast this weekend.Since i had some chicken in hand so this is what i whipped up and it was a wonderful breakfast a break refreshing break from our everyday southindian fares or breads.


Friday, March 8, 2013

Rajasthani kadhi

I got this book Rajasthani Cooking by Tarla Dalal last year from Gayathri.I didn;t get a chance to thank her sending it over.My Mango kulfis won me this award.Those kulfis like my DH said were my one of my most successful trials.And a super duper hit.

Today's recipe is a rajasthani kadhi out of that book.I have tried many of these recipes which do not need coconut or any grinding while i was in London(since i didn't have a mixie there).So this was one really easy curry that was a good accompaniment to rice and chapatis equally!

Kadhi is the northie cousin of the southie more kuzhambu.We make our more(buttermilk) kuzhambu/curry with a variety of soft vegetables like ashgourd, pumpkins,green mangoes and even ladyfingers, while the kadhi is made with pakodas.It is a simple yet tasty dish which suits well with plain steamed rice, jeera rice or even chapatis.


I served it with steamed rice and roasted potatoes for lunch and with chapatis for dinner.


You need

For the kadhi
Yogurt 2 cups
Besan/chickpea flour 1 cup
Chilli powder 1 tsp
Turmeric powder 1/2 tsp
Salt to taste
Hing/asoefetida a generous pinch

For the seasoning:
Oil 2 tsp
Coriander seeds 1/2 tsp
Jeera/cumin seeds 1/2 tsp
Mustard seeds 1/2 tsp
Dried red chillies 2
Curry leaves a sprig

For the pakodas
Besan 2 tablespoon
Chopped coriander leaves 2 tablespoons
Green chillies 1/2 chopped finely
Turmeric powder 1/4 tp
Baking soda a pinch
Salt to taste
Water to mix
Oil to deep fry


  • Mix the ingredients for the kadhi in a bowl with a whisk so it stays lumpless.Set aside.
  • Heat this on a low/medium flame and keep whisking it until gets nice and thick and the raw besan smell goes away for about 7-10 minutes.Turn off the flame and let it cool.
  • Mix the ingredients for the pakodas, mix enough water so that it should just drop into the oil with a spoon.Not too runny not too thick.
  • Deep fry the pakodas and drain on a tissue paper.
  • Drop the pakodas into the kadhi.
  • Heat oil in a pan, add the seasoning and pour in over the kadhi.
  • Serve hot with rice and roasted potatoes.


The pakodas need to soak up the flavours of the kadhi so this tastes better after sometime of cooking.

Have fun enjoying Rajasthani food.

Sending this to ONLY cookbooks event at runner in the girl and Paris space 

You May also like

Related Posts Plugin for WordPress, Blogger...

ShareThis